✅ Ambiente refrigerado e confortável
✅ Equipamentos novos e de qualidade
✅ 2 vagas para estacionamento
✅ Funcionamento: Segunda à sexta das 9:00 às 18:00


” Investir no relacionamento com pacientes é essencial para o sucesso do consultório”

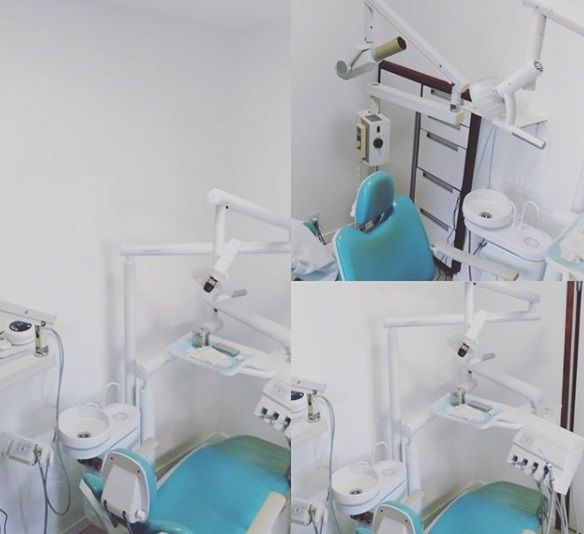
✅ Ambiente refrigerado e confortável
✅ Equipamentos novos e de qualidade
✅ 2 vagas para estacionamento
✅ Funcionamento: Segunda à sexta das 9:00 às 18:00


” Investir no relacionamento com pacientes é essencial para o sucesso do consultório”


The biteplane is an appliance used to reduce a deep overbite, whereby the upper front teeth overlap the lower front teeth excessively. It works by preventing the patient from biting down all the way on his or her back teeth. This allows the back teeth to emerge naturally, which reduces the overlap of the front teeth.
The biteplane is made of wire and acrylic, which can be removable or cemented in place by an orthodontist. The removable biteplane is most effective when worn all the time. The quality of our end result and completing treatment on time is dependent upon the patient wearing the biteplane consistently.

Obstructive sleep apnea is a sleep disorder in which a person stops breathing periodically throughout the night due to physical obstructions of the airway. These stops in breathing usually last for around ten seconds and are often followed by snorts, gasps, or choking sounds as a person’s body fights to resume breathing again.
When you sleep, the muscles in your body relax so they can begin to repair themselves to keep you healthy and active everyday. However, muscles in your mouth and throat also relax during sleep, and for some people (an estimated 18-20 million U.S. adults) these muscles along with soft fatty tissues relax to the point where they fall back into the upper airway and block the flow of oxygen from coming in.
When you stop breathing during the night, your brain responds by partially waking to send signals to the respiratory system to work harder to get past the obstruction.
If you’re one of the many Americans who use dentures (also known as a dental appliance), you probably know that it’s important to care for them.
But if you’re uncertain about how to keep your dental appliance clean and comfortable, you’re not alone. Follow the tips in this article to keep your dentures – and your mouth – healthy and clean.
Dental appliances include full and partial dentures that can be made of metal, acrylic, or hard or soft resin, and will fill in the gaps where there has been tooth loss. There are also “overdentures,” which fit over the natural teeth roots.
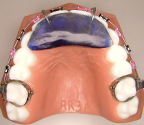
The transpalatal bar / Nance / lingual arch appliances are used in the upper and lower arches to maintain space. Primarily, they are placed in patients who are in transitional dentition (not all adult teeth have erupted), to hold space in the arch for the permanent teeth to erupt. In cases where it is appropriate to use this appliance, it will be part of the beginning phase of orthodontic treatment.
The transpalatal bar / Nance is a metal bar attached to the tongue side of the upper first molar bands, and form-fitted along the roof of the mouth, and it may or may not have acrylic. The transpalatal bar helps to maintain the width of the dental arch. We commonly use this appliance for patients who have an impacted permanent tooth, and exposure of that tooth is suggested.
The bionator is a removable appliance used to help correct an “overbite” by promoting lower jaw growth. In cases where it is appropriate to use this appliance, it will be part of the beginning phase of orthodontic treatment.
Since a bionator is primarily an orthopedic appliance which influences the growth of bone, the appliance should be used during a period of maximum growth. Generally, the younger the patient’s age when it is used, the more change observed over a period of growth.
If the patient doesn’t grow during use of the bionator, only changes in tooth position will be seen. When a patient reaches the stage we call skeletal maturity, this appliance is no longer effective at influencing jaw growth.
The biteplane is an appliance used to reduce a deep overbite, whereby the upper front teeth overlap the lower front teeth excessively. It works by preventing the patient from biting down all the way on his or her back teeth. This allows the back teeth to emerge naturally, which reduces the overlap of the front teeth.
The biteplane is made of wire and acrylic, which can be removable or cemented in place by an orthodontist. The removable biteplane is most effective when worn all the time. The quality of our end result and completing treatment on time is dependent upon the patient wearing the biteplane consistently.
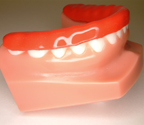
A bitesplint is a custom-fit rubber mouthpiece worn on the lower teeth. A bitesplint is primarily used to help in the correction of a crossbite (upper teeth inside of lower teeth), and is worn along with upper braces. This appliance prevents the patient from biting completely, and that allows for the tooth or teeth in crossbite to be moved into the correct position.
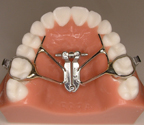
The fan-type expander widens the front of the upper arch without widening the back.
As shown in the illustration, the fan-type expander is comprised of metal bands that are placed on the six-year molars, which are attached via metal bars to the main body of the appliance. The main body of the appliance is joined at the center by an expansion screw.
Since an expander is primarily an orthopedic appliance (influences the growth of bone) the younger the patient’s age when it is used, the more rapid and more stable the correction.
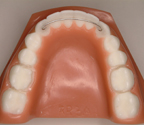
Fixed lingual retainers are wires bonded behind the upper and/or lower front teeth, on the day the braces are removed. The lower wire is bonded in place to stabilize the lower front teeth during the retention phase of treatment. This wire remains in the mouth for at least two years, but ideally should remain as long as the patient is able to keep the back side of the lower front teeth clean.
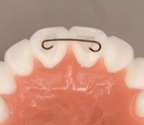
When a fixed retainer is used in the upper arch, it is usually behind the two upper front teeth. This is typically used for patients who had a large space between the front teeth before orthodontic treatment. The upper fixed lingual retainer should remain in place for as long as possible, or until your general dentist recommends it be removed.
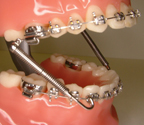
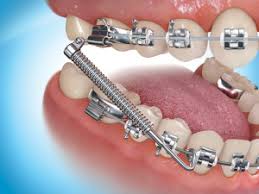
Forsus springs are used in cases where the upper teeth are forward of the proper fit with the lower teeth. They have almost the same effect as rubber bands and are primarily used when patients have proven to be uncooperative with rubber band and/or headgear wear.
They are NOT a substitute for headgear though. If headgear wear is poor, then Forsus springs may offer an acceptable compromise. Forsus springs are used as a second resort because rubber bands are usually more comfortable to wear and allow for easier brushing.
Forsus springs are used in conjunction with upper and lower braces and are placed by an orthodontist. They are held in place by tubes on the upper molars and attached to the lower archwire. The springs work EXTREMELY well because they are not removable and ensure a constant force on the teeth.
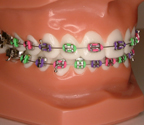
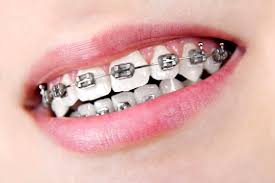
Braces are the mechanism we use to “get a handle on the teeth.” In other words, they merely provide an attachment with which we can grab and move the teeth. Traditionally, full braces involve bands that are placed on the molar teeth (which wrap entirely around the tooth) and brackets bonded to all other teeth. A special type of glue is used to bond the brackets to the teeth. It is just strong enough to keep the braces on during treatment, but must be weak enough so the braces can be removed when treatment is complete.
Oral hygiene, including tooth brushing and flossing, is EXTREMELY important during orthodontic care. Braces attached to the teeth provide many more places for food particles and plaque to accumulate. This debris is easy to remove with thorough and proper brushing and flossing. Without proper hygiene, the patient is at risk for developing decalcification (white marks) on the teeth, cavities, and puffy, overgrown gum tissue.
The photo above illustrates one type of braces we offer. Different colored “ties,” which hold the archwire to the bracket, may be chosen at each appointment. For mature teens and adults, we also offer ceramic brackets. These brackets are less noticeable because they are the same color as your tooth. Remember, though, that the archwires going through the brackets will still be visible.
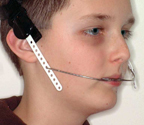
This appliance is used when there is a difference in growth between the upper and lower jaws, such that the upper teeth and jaw are too far forward of the lower teeth and jaw. This condition is often responsible for the appearance of protruded upper front teeth or “buck teeth” and can also cause an excessive vertical overlap of the front teeth or “deep bite.”
This appliance may also be used to prevent the upper back teeth from slipping forward during space closure in patients who have had extractions for bite correction. The headgear uses the back of the neck (see photo) as an “anchor” to correct this relationship. The inner part of the headgear slides into tubes on the side of the first molar teeth.
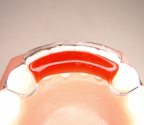
In cases where there is plaque and calculus build up and/or there is a hygiene problem with swollen gums, it may be recommended that a lower spring retainer be used. We also use this retainer when there has been a small amount of relapse in tooth movement.
This is a small removable wire and acrylic retainer that fits over the lower front teeth. The lower spring retainer may be used simply to hold the alignment of the teeth or to correct slight rotations or crookedness.
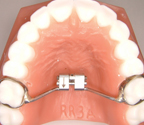
In the field of orthodontics, no appliance is more effective at expanding the maxillary (upper) arch. A palatal expander is our first choice for patients who require an increase in the width of the upper dental arch. This not only corrects crossbites, but it creates needed space when there is crowding.
Palate expanders use two or four teeth to anchor themselves in place, and by turning a small screw (shown in the center) we are able to achieve expansion of the upper jaw by as much as 3/4 of an inch! The goal of the appliance is not just to move the teeth apart, but also to move the bones of the palate apart.
Since a palate expander is primarily an orthopedic appliance (influencing the growth of bone), the younger the patient’s age when it is used, the more rapid and more stable the correction. When a patient reaches the stage we call skeletal maturity (approximately age 16 for girls and for boys around the age of 18), the two bones that comprise the upper jaw fuse, and expansion through orthopedics is extremely difficult without surgical assistance.
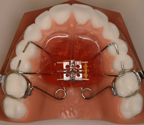
The pendulum/pendex appliance is used primarily in cases where the upper molars are too far forward and need to be moved backward. The objective is to make the upper teeth fit correctly with the lower teeth.
As shown in the illustration, the pendulum/pendex appliance is composed of bands placed on the first molars, which are in turn attached via a coiled wire to the main body of the appliance. The main body of the appliance is made of plastic, which may have an expansion screw. The body of the appliance is anchored in place by bonding on the chewing surface of the teeth in front of the molars.
If the appliance has an expansion screw, the activation of the screw allows the molars to be moved outward while the coiled wire moves them backward.
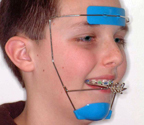
A reverse pull headgear is used to correct skeletal Class III malocclusions, which means the upper jaw is less prominent than the lower jaw. In other words the upper jaw is behind, or the lower jaw is forward. A dental “underbite” commonly accompanies this jaw relationship. This means the lower front teeth are in front of the upper front teeth.
The goal of the reverse pull headgear is to encourage forward growth of the upper jaw, which can correct the underbite and improve facial appearance.
It is most common to use this appliance at a very young age; in fact, the younger, the better! In some cases which would eventually require jaw surgery, it can be avoided by proper and consistent use of the headgear.
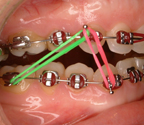
Rubber bands are the primary mechanism we use to move teeth so they fit together correctly top to bottom. They can be worn in any number of configurations. Rubber bands are attached using hooks that are part of the brackets or the bands.
Always remember that braces merely give us a way to “grab onto” the teeth. It is the rubber bands and wires that move the teeth. The rubber band phase of treatment is the one that takes the longest in the average patient. Please keep in mind that the rubber bands only move teeth; however, if you have any discomfort in your jaw joint, please let us know.
The quality of our end result and completing treatment on time is dependent upon the patient following instructions for wearing rubber bands precisely. In most instants, this means all the time. For those who seek maximum aesthetics, we have tooth-colored rubber bands. For those who want to make a fashion statement, we have fun colors.
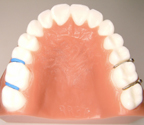
Separators are small rubber or metal rings that are placed between the contacts of the teeth. Their purpose is to create space between the teeth to allow for the placement of bands on the molar teeth.
The separators are placed five to ten days prior to the start appointment. Initially, they may cause some minor discomfort. Patients sometimes say it feels like a piece of meat stuck between their teeth.
During this period, we ask the patient to avoid sticky or chewy foods to prevent them from becoming dislodged. You will need to check them periodically, and if they fall out, please contact our office to determine if they will need to be replaced.
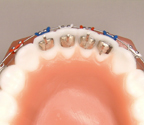
Tongue spurs are used in cases where a patient has a strong tongue-thrust habit or thumb-sucking habit, which may cause an open bite (upper front teeth do not meet the lower front teeth when biting). The tongue spurs will help assist the patient in retraining his or her tongue when swallowing or preventing the patient from comfortably sucking a thumb.
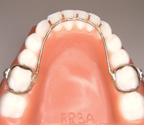
Tongue spurs are small metal hook-like wires placed behind the lower front teeth. They can be glued individually on the lower front teeth as shown, or they can be attached to a wire that is connected to the first molars.
The spurs will remain in the mouth until the patient has successfully retrained his or her tongue and stopped the harmful habit. Continuation of tongue thrusting or other finger habits is a major cause of treatment delays, failure, and retention relapse.
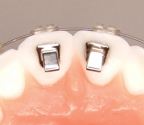
Turbo brackets are appliances used to reduce a deep overbite, whereby the upper front teeth overlap the lower front teeth excessively. These appliances work by preventing the patient from biting down all the way on his/her back teeth; this allows the back teeth to emerge naturally, thus reducing the overlap of the front teeth.
The turbo brackets are small metal brackets cemented behind the two upper front teeth. They are extremely effective because they cannot be removed. However, they may cause difficulty during eating, at first. We recommend eating soft foods during this transition, and expect you may the back teeth to come together over the course of a few months.
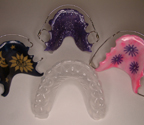
The slip cover or Essix retainer (clear plastic) is the first initial retainer that most patients receive on the day the braces are removed. The slip cover retainer is to be worn at all times until the patient receives a Hawley retainer.
These retainers effectively maintain the alignment of teeth, while simultaneously allowing for controlled, minute movement of teeth which orthodontists call “settling.” When worn as instructed, the bite actually improves in the critical first few weeks after the braces are removed.
Retainers are truly as important as braces in the long-term result of orthodontic treatment. And YES, retention is a lifelong commitment. Shifting and crowding of the teeth have been shown to be part of the normal aging process. Your retainers allow you to keep your youthful smile long after nature intended.
Remember, though, that your teeth will be their straightest the day your braces are taken off. It is normal to have some slight changes in alignment even with flawless retainer wear. To keep these changes to an absolute minimum, wear your retainer(s) as instructed.
Please follow our use, care, and maintenance instructions carefully. We will advise you of any special instructions for your particular case.
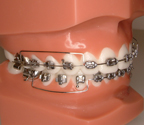
Before braces can be placed on all the teeth, we often need to create space and correct the overbite (excessive vertical overlap of front teeth). One way to accomplish this is by placing upper and/or lower utility arches. These are wires that run directly from the molars to the font teeth, and bypass the premolars.
Sometimes we start treatment by bonding just the first molars and the front four teeth and use utility arches to begin aligning the teeth and correcting the overbite. Other times we use the utility arches in conjunction with full braces (as pictured).